Step-by-step launch sequence – WordPress websites

When it comes to launching a new website there are certain steps that we take to ensure that the website performs as well as it can in those first few weeks.
It’s well-known that Google and other search engines will see a new website as less-credible that ones that have been around for a long time. For Google this is typically called “the Google sandbox“. The good news is that here at West Norfolk Web Design we’ve found and use ways to ensure that websites get out of the sandbox as soon as possible.
“We’ve launched nearly 1,000 websites for our customers and through our partners. Along the way, we’ve encountered most of the issues related to searchability and had to resolve them for our customers.” – Ryan Seymour, Director West Norfolk Web Design
Table of contents:
- Creating a sitemap
- Submitting a sitemap to Google Search Console
- Setting up Google Analytics
- Adding your website to Google Business Profile
- Website Promotion
Here is our step-by-step launch guide;
1. Create an effective sitemap
A sitemap is a file or files which list the various URL’s for a specific website. For example you can find ours here: https://wnwdtest.wnwd.co.uk/sitemap.xml
WordPress sitemaps are typically the same, and are split up into the different “post types” on the website; Posts, Pages, Taxonomies and Authors, as well as any Custom Post Types. Within each of these you’ll see the page URL’s. These are the “indexable” URL’s we want Google to see.
Before we ever launch a website, we setup and configure a sitemap. These will be different for each website, but will mostly follow the same format. Our go-to plugin for this is Yoast SEO.
2. Submit the sitemap to Google Search Console
Once you’ve created your sitemap, you’ll need to submit it to Google & other search engines. For Google you can use Google Search Console. For the next steps you’ll need;
- Access to your DNS
- A Google Account
- Your Sitemap URL from step 1
To start, Login or Sign Up to Google Search Console. Once logged in, select “Add Property” – and enter the website URL (we recommend Domain over URL prefix to allow for HTTPS and HTTP).
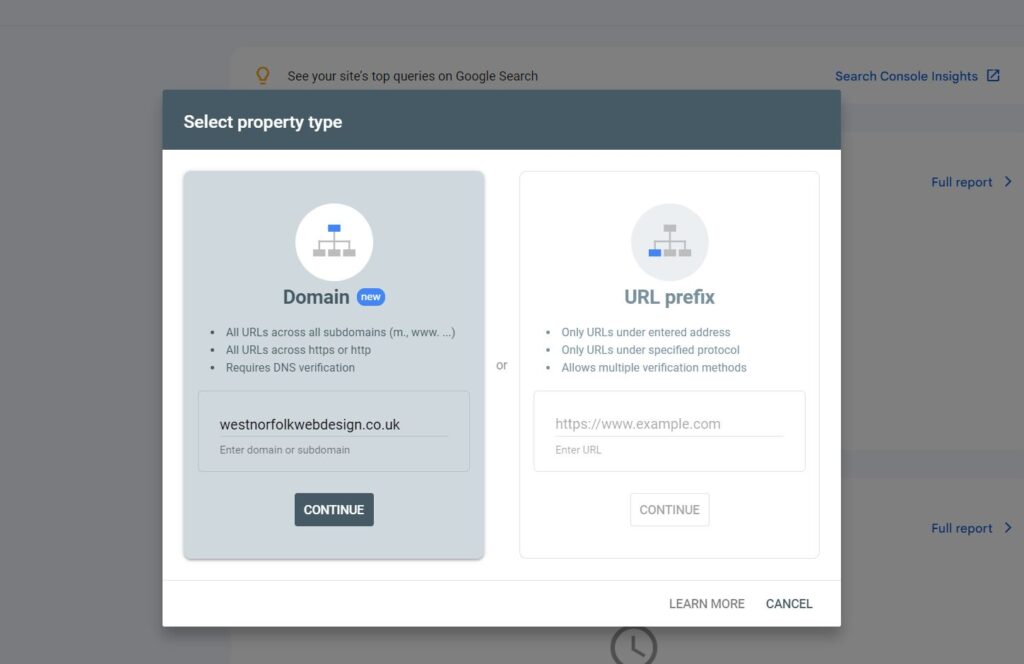
At this point Google will ask you to verify the property – We recommend for speed either using a HTML file that you can upload to the root of your server. Or the DNS option, which gives you a TXT record to add to your domain.
Once you’ve verified the property, we need to submit the sitemap. In the dashboard, navigate to “Sitemaps”.
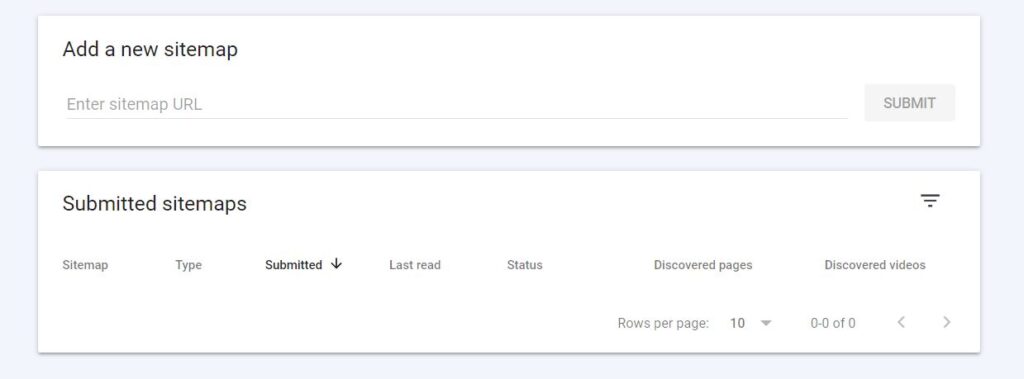
Simply enter the FULL Sitemap Path/URL https://wnwdtest.wnwd.co.uk/sitemap.xml and hit submit. Once submitted, Google will Read and Crawl the URLs.
BONUS POINT: Manually Inspect each URL
From the property screen you should notice what looks like a search bar at the top of the screen. It should have a placeholder like “Inspect any URL in “{YOUR_URL}””. In here you can enter each URL within your sitemap; Google will then check it’s availability and Indexability.
You can then “Request Indexing” of that specific page/URL. Why is this useful? Well put simply, Google adds that URL to a priority Crawl Queue, which means it doesn’t have to be “discovered” but is instead forced to be indexed!
Every time we launch a website, we will request indexing manually for EVERY URL on that website.
3. Setup and Configure Google Analytics
Now that we’ve asked Google to index our website, we better track the traffic! To do this we recommend setting up Google Analytics. This platform will show you live users on the website, which pages are most popular and lots more. It can be setup in a Basic or Advanced Way depending on how in-depth you want your data to be.
Every website we launch we will setup a new Google Analytics property for that customer. That way we can see how their website is doing, and so can they!
The process for adding a website to Google Analytics starts off much the same as for Search Console.
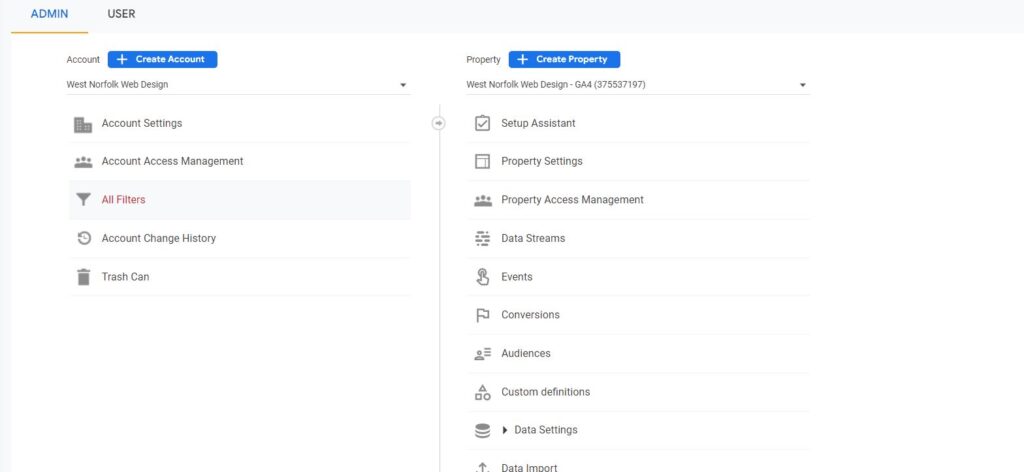
Logins or Create an account at https://analytics.google.com/
Create an account, and then create a property:
During the creation process, you’ll be asked to add a tracking tag to your website. This can be done via a WordPress plugin or by manually copy and pasting the code into your header.php file.
Essentially you want the code snippet or tag on every page you want to track. Which is traditionally every page on the website. That’s why adding it into the theme’s header.php file is the easiest way to do it. In theory your theme should call this file for every page.
4. Create or Update your Google Business Profile
A really quick way to drive traffic to a website is using a Google Business Profile (GPB). Especially if your brand/company has been around a while, with customers searching for your business name.
Your GBP profile can have a Website Link – To update your profile head over to https://www.google.com/intl/en_uk/business/ and login/sign up.
For this guide we are going to assume you’ve already got an account. But our GBP guide will follow shortly.
- Manage your business/s to enter the dashboard
- Select the profile you wish to manage
This will return you to Google but with your profile tools at the top of the search:
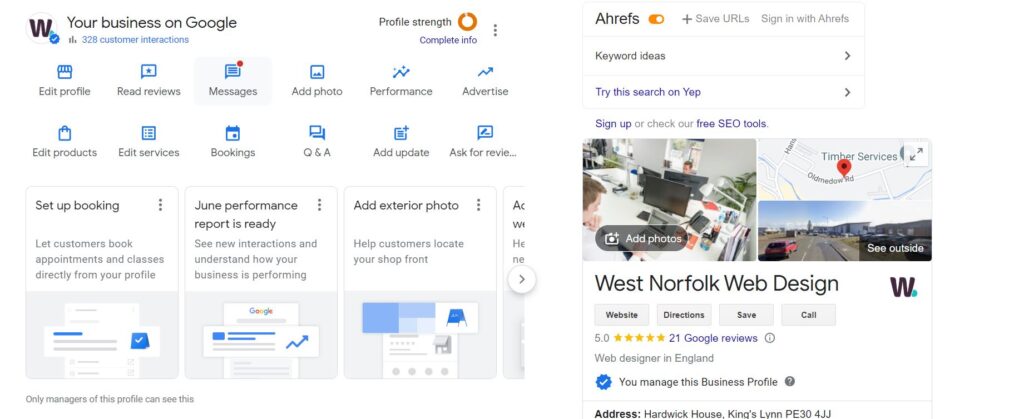
At this point, click Edit Profile. Heading over to the “Contact Tab” of the popup.
In there select Website; and enter the Website URL. After a short period of time, Google will start to show the website button (call to action) on your profile.

#WebsiteLaunchRecap
So far in this guide we’ve;
- Created an easy way for our website URL’s to be discovered by creating a sitemap
- Submitted that sitemap to Google and instructed it to manually index our URL’s
- Added in a tracking code we can see how our website performs
- Made it easy for people to visit our website using Google Business Profile
What next?
5. Promote the website!
Now you’ve got a website that’s easy to index, promote it. Head over to your social media platforms, ask for links from other websites and setup Directory Listings.
Social Signals and Directory Listings are a quick way to build your Trust Score with search engines.